Glacier hiking can look deceptively simple: a broad white surface, a visible route, and perhaps a line of footprints leading toward the ice. In reality, glacier hiking safety depends less on walking ability than on recognizing terrain that can change quickly and conceal hazards. Crevasses may be open and obvious, or hidden beneath snow bridges. Meltwater can undermine ice. A route that was straightforward earlier in the season may become broken, slick, or impassable after warm weather.
That is why glacier trekking should be treated as a specialized mountain activity rather than an ordinary hike with colder scenery. The central question is not, “Do I have enough gear?” It is, “Do I have the knowledge, conditions, route information, and margin to make good decisions on this glacier today?”
Why Glacier Terrain Is Different From a Normal Hiking Trail
A maintained hiking trail is usually designed to steer people around major terrain hazards. A glacier is moving ice. Its surface changes as the ice flows, snow accumulates, temperatures rise, and meltwater drains. Crevasses form where the ice is stressed, and snow can partially or completely cover them. The U.S. National Park Service warns that snow bridges can conceal deep crevasses and may collapse under a traveler’s weight.
Visibility can also change the character of a trip within minutes. In fog, cloud, snowfall, or a whiteout, surface contrast disappears and route-finding becomes much harder. On exposed ice, a slip can become difficult to arrest. These are reasons ice hiking safety requires conservative decisions before conditions become obviously dangerous.
Crevasse Awareness Is About More Than Spotting Cracks
Open crevasses are only part of the problem. Buried or partly covered crevasses are harder to judge, especially when recent snow has obscured their edges. Previous footprints do not prove that a snow bridge remains strong. Snow strength changes with temperature, sunlight, rainfall, wind loading, and time.
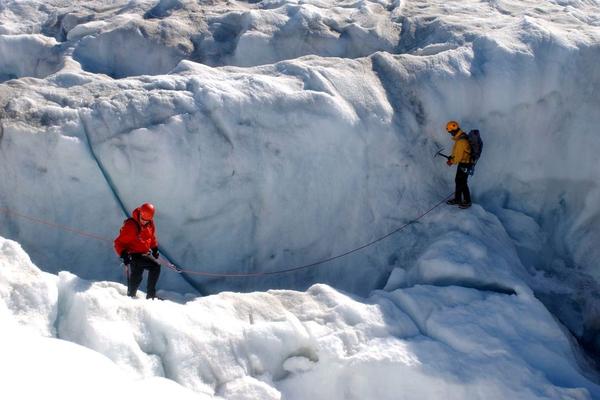
For technical glacier travel, experienced parties may use roped travel, harnesses, crampons, ice axes, and crevasse-rescue equipment. Those tools are useful only when the group knows how to travel and respond correctly. A rope does not automatically make glacier travel safe; poor spacing, poor anchors, or lack of rescue training can still leave a team in serious trouble.
When a Guided Glacier Hike Makes Sense
For travelers without glacier experience, a guided glacier hike is often the most sensible way to access glaciated terrain. A qualified guide adds something far more valuable than equipment: local route knowledge and ongoing judgment. Guides monitor surface conditions, identify likely crevasse zones, choose where to cross, adjust pace, and decide when a route should be changed or abandoned.
Before booking, ask what terrain the trip enters, what equipment is provided, how much previous experience is expected, what happens if weather deteriorates, and what guide qualifications or local authorizations apply. Also ask how the operator handles route changes and cancellations. A company that is willing to turn around when conditions are poor is showing sound risk management, not delivering a lesser experience.
Gear Helps, but It Has Limits
Glacier equipment varies with the route. A simple commercial walk on low-angle ice may use different systems from a mountaineering traverse over snow-covered crevasses. Depending on the objective, equipment may include a helmet, suitable boots, crampons or other traction, a harness, rope, ice axe, navigation tools, warm layers, waterproof protection, gloves, eye protection, food, water, and emergency supplies.
The key limitation is that equipment cannot compensate for missing skills. Crampons can improve grip, but they introduce their own technique requirements. Navigation tools are useful only if someone can use them in poor visibility. A rope team needs training, not just a rope. For related trip preparation, natural internal links could include glacier trekking gear checklist, mountain weather planning, and adventure travel emergency planning.
Weather and Timing Can Change the Risk
Mountain weather can deteriorate rapidly, and glacier surfaces respond to temperature. Warm conditions can expose harder ice, weaken snow bridges, increase meltwater, and reveal new cracks. Fresh snow can create the opposite problem by hiding features that were easy to see the day before.
Consider a practical scenario: you arrive for a planned crossing after several unusually warm days. The sky is clear, but the guide reports that sections of the normal route have opened and yesterday’s boot track now passes close to sagging snow. Continuing because the weather “looks perfect” would miss the real issue. The safer decision may be a shorter route, a different glacier section, or no glacier travel at all.
How to Make a Go or No-Go Decision
A good glacier decision combines several factors rather than relying on one reassuring sign. Check current local conditions, the specific route, recent weather, forecast visibility, group experience, equipment, turnaround time, and whether everyone understands the plan. If you are depending on a guide, follow the guide’s route and instructions rather than leaving the group to explore nearby ice features.
Reasons to postpone or turn around include worsening visibility, unexpected open water or collapsing ice, uncertainty about the route, deteriorating snow bridges, equipment problems, a team member who is cold or exhausted, or conditions that exceed the group’s skills. Turning back early preserves options. Waiting until the situation feels critical usually means the margin has already narrowed.
Frequently Asked Questions
Is glacier hiking safe for beginners?
Beginners can experience some glaciers safely through professionally managed trips on suitable terrain, but an unguided glacier is not simply a beginner hiking route. The appropriate choice depends on the glacier, current conditions, route type, and the person’s training.
Can you walk on a glacier without a guide?
Experienced mountaineers do travel on glaciers without professional guides, but they typically have training in glacier navigation, roped travel, crevasse rescue, weather assessment, and route selection. Travelers without those skills should not assume visible tracks make independent travel safe.
Are crampons enough for glacier hiking?
No. Crampons provide traction on firm snow or ice, but they do not solve crevasse, navigation, weather, or rescue problems. On some routes they are only one part of a larger technical system.
What is the biggest glacier hiking hazard?
There is no single hazard that dominates every trip. Hidden crevasses, falls on hard ice, poor visibility, changing weather, unstable snow bridges, meltwater, and route uncertainty can all become serious. The most effective safety approach is to assess how those hazards combine on the specific day and route.
Plan for the Glacier You Find, Not the One You Expected
Glacier hiking safety is ultimately a decision-making discipline. Good equipment matters, but good judgment matters more. Treat changing ice as normal, build crevasse awareness before stepping onto glaciated terrain, use qualified guidance when your skills do not match the route, and keep enough flexibility to change plans. The goal is not to force the itinerary to work. It is to return with the experience still feeling worth the risk you chose to take.